Setting up the Core to run on a VPS (Virtual Private Server)
One of the major benefits that MoonTrader offers is the possibility of running your core on a VPS, as close to the exchange’s servers as possible (e.g. Binance’s exchange servers are located in Tokyo and AWS offers VPSs in Tokyo too) which would highly increase the speed at which your actions are relayed to the exchange, executed and a reply from the exchange is received. Having placed your Core on a VPS, you can then launch the Client independently, on any machine that you physically have in front of you to monitor the market, check the productivity of your automated trading algorithms, make changes/edit your algorithms and create new algorithms altogether or simply trade manually.
We currently support the following:
- Windows instances of VPS: Windows Server 2021/2024
- Linux instances of VPS: Ubuntu (LTS 24.04), AWS Linux (centOS). IMPORTANT NOTE: Linux distributions that have an openSSL library version lower than 1.1.1 might encounter difficulties establishing a safe connection to the Exchange’s API servers. We are unable to influence this issue in any way. Thus, you must update this library BEFORE running MoonTrader on that distributive.
Ubuntu 24.04 comes with the required version by default (3.0.13), for that reason, we highly recommend this distributive!
1. Running The Core On a remote Windows VPS:
PREREQUISITES: you should have a Virtual Private server (provider of your choice e.g. AWS, Azure etc) running Windows Server 2016 at least and have rules that will allow inbound traffic through UDP connections via port 4242 (by default, can be changed by users) both on the Service Provider side and in the Firewall settings on the VPS!
- Set up the profile you want to run on the VPS locally, on your PC/Laptop
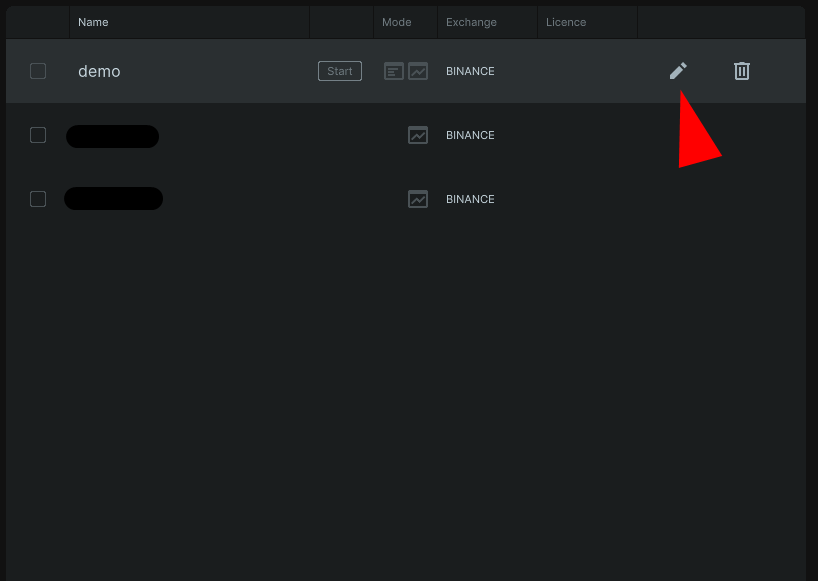
- Make that Profile your default profile by checking the box on the left of the Profile (as shown below)

- Add the entire folder that contains the current version of MoonTrader to an archive (see below)

- Place the archive on your VPS and unpack it there (we recommend unpacking right on the Desktop of your VPS, do not go for any system folders)
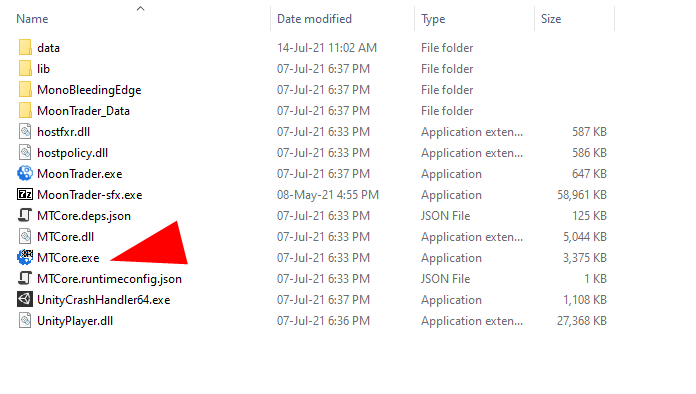
- From the freshly unzipped folder, run MTCore.exe (see below) and leave the VPS (do not close the running MTCore.exe console window!)
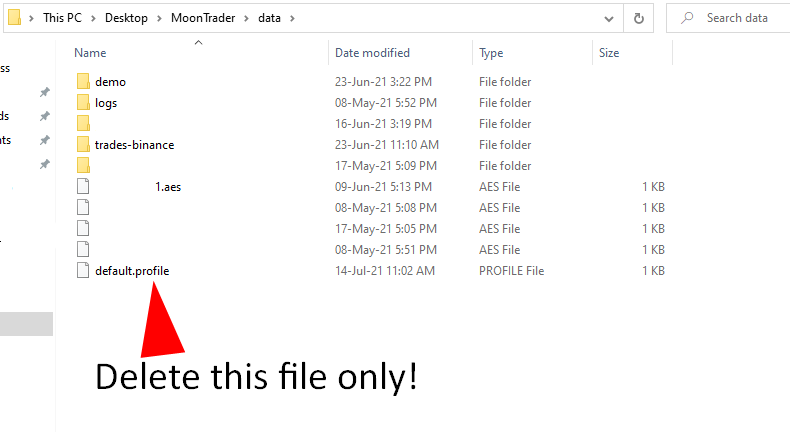
- Go back to your local machine that will be running the Client only. Delete the default.profile file from the “data” folder in your MoonTrader folder (see below). This will allow you to open the Profiles page in MoonTrader instead of jumping straight into one of the profiles, you will need to make some changes to the profile you just placed on the VPS so it would only run the Client
- Now Run MoonTrader.exe on your local machine
- Go to the settings of the profile you want to run on the VPS (see below)
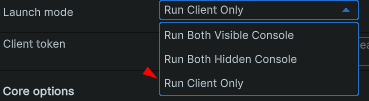
- Choose the Run Client Only mode in the Launch mode selector and add the Public IP address of your VPS in the corresponding field. If you have not selected a custom Port, the default port remains unchanged (see below)
- Now run the profile. This profile will now connect to the MTCore running on your VPS!

- Good luck with your trading!
2. Running the Core on a remote Linux VPS:
Here is the translation of the instructions into English. I have formatted the code and commands into blocks to make them easier to read and copy.
1. Update the system
For Ubuntu:
Bash
sudo apt update && sudo apt upgrade -y
For AWS/Amazon Linux:
Bash
sudo yum update
2. Install necessary libraries for x86-64 architecture
Install libtommath:
Bash
sudo apt install libtommath1
2.1 Install necessary libraries for ARM architecture
Bash
sudo apt-get -y install libncurses6 libtommath1
3. Create symbolic links for x86-64 architecture
Bash
sudo ln -s /usr/lib/x86_64-linux-gnu/libtommath.so.1 /usr/lib/x86_64-linux-gnu/libtommath.so.0
sudo cp /usr/lib/x86_64-linux-gnu/libncurses.so.6 /usr/lib/x86_64-linux-gnu/libncurses.so.5
3.1 Create symbolic links for ARM architecture
Bash
sudo ln -s libtommath.so.1 /usr/lib/aarch64-linux-gnu/libtommath.so.0
sudo cp /usr/lib/aarch64-linux-gnu/libncurses.so.6 /usr/lib/aarch64-linux-gnu/libncurses.so.5
4. Download and unpack the Core
Download the archive:
- For x86-64:
wget https://cdn3.moontrader.com/beta/linux-x86_64/MoonTrader-linux-x86_64.tar.xz - For ARM64:
wget https://cdn3.moontrader.com/beta/linux-arm64/MoonTrader-linux-arm64.tar.xz
Unpack the contents into a separate folder:
- For x86-64:
tar -xvf MoonTrader-linux-x86_64.tar.xz - For ARM64:
tar -xvf MoonTrader-linux-arm64.tar.xz
5. Run the Core from the MoonTrader directory
NOTE: In order for the Core to continue running after the server connection is closed, you must run the Core via a
tmuxorscreensession.
Start tmux or screen:
Bash
tmux
(or screen)
Navigate to the MoonTrader directory and run:
Bash
./MTCore
- Activation Process: Follow the instructions bellow to activate the Core using the activation code from your MoonTrader Personal Cabinet, and to configure security, IP, and port (default: 4242).
- Enter API keys: You will be prompted to enter your public and private API keys.
7. Stopping the Core
- To stop: Use
CTRL+Cor terminate the process using the commandkill PID.
Now the Core should run independently, even after disconnecting from the VPS.
Would you like me to explain how to use tmux specifically for keeping the session alive, or clarify any of the Linux commands used here?
- Now this folder should have the following structure:
.
├── data
├── lib
│ ├── fbembed64lin
│ └── mtdb011.fdb
├── MTCore
└── MTCore-linux.tar.xz
- Now run the core using this command:
./MTCore
- During the FIRST launch of the core, you will have to go through the Activation process:
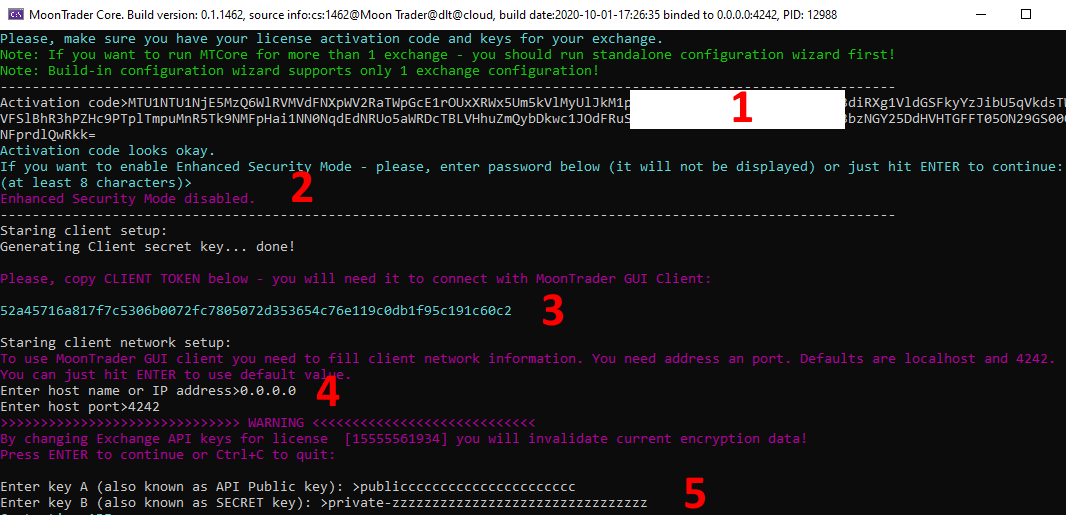
- You will first need to insert your Activation code from the License Manager website
- You may then enable an Enhanced security mode if you wish, otherwise just press ENTER
- You should then see the Client Token (we HIGHLY advise you to save it somewhere safe because you will need it later to connect to this core!)
- You will then be offered the possibility to choose a hostname or IP address. The default ip address is 0.0.0.0 which will allow connections from any external ip address (you can leave that as is) and a port number (4242 is the default), which you can change if you want. Otherwise make sure that your VPS Linux instance allows connections through that port
- Next you will be prompted to insert your Public API key
- Next you will be prompted to insert your Private (Secret) API key
- The core is now running
- To STOP the Core, you can either do CTRL+C or if you’re running it in a screen, find the process using top command, find the PID and then kill PID
Once finished, your Core must start running automatically. If you have done all above operations in a screen, you can now detach using CTRL+a+d. Now you can disconnect from your VPS while the core is running.
Although setting up the Linux and Windows VPS differ, connecting to either one from your local machine is the same process as described for Windows, above. To recap, follow the steps in the next Chapter.
3. Connecting to the Remote Core:
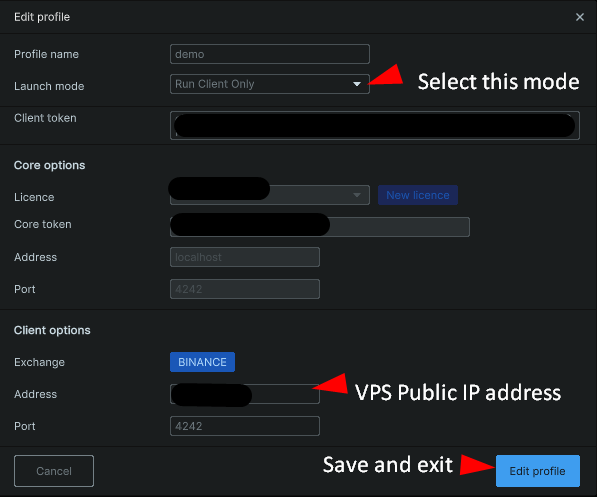
- Add a new Profile in the Application. Name it accordingly so you could easily recognize it
- Select the Run client only Launch mode
- You will notice that the Core options section of the screen has gone inactive (light grey)
- The Client Token was generated automatically on step 3 after the initial launch of the Core on the Linux VPS. Insert that Client Token in the this field
- The Address in the Client Options section below is the PUBLIC IP address of your VPS!
- The Port is 4242 by default, you should insert the one you’ve used on the VPS (if different)
- Click Edit Profile to save and exit
- You should now see the new instance appear in the Profile list.
- If your core is already running on the VPS (as it should), click on Start. Your Client Window should now open and you can now start trading.
- Closing the Client window will not stop the Core.