About HyperLiquid Exchange
HyperLiquid is a decentralized exchange for trading cryptocurrency derivatives (futures and perpetuals). The exchange operates on its own HyperEVM blockchain and uses the Arbitrum One network for deposits and withdrawals.
HyperLiquid Features:
- Connection via Web3 wallets (no mandatory email registration)
- Trading perpetual contracts with leverage up to 50x
- Low transaction fees
- High order execution speed
- API for automated trading
MoonTrader Referral Program
Use the MoonTrader referral link to connect to HyperLiquid: 👉 https://app.hyperliquid.xyz/join/MOONTRADER
By registering through this link, you gain access to the MoonTrader bonus program. Detailed terms and program details will be available after connection.
Connection Process
This section describes the process of connecting the HyperLiquid exchange to the MoonTrader terminal via a Web3 wallet. You will create or connect a wallet, configure exchange access, and create API keys for automated trading.
Requirements:
- Smartphone (Android/iOS) or browser extension
- Web3 wallet (MetaMask, Rabby, Trust Wallet, or other)
- ~$30 to get started ($5–10 ETH for gas fees + USDC for trading)
About Wallet Selection
HyperLiquid supports connection through any Web3 wallets: MetaMask, Rabby, Trust Wallet, exchange wallets (Binance Wallet, OKX Wallet), and other compatible wallets supporting WalletConnect.
In this guide, we use MetaMask as an example. The connection process for other wallets will be similar — only the application interface and button locations will differ.
1. MetaMask installation and setup
Installing the Application
- Download MetaMask from the app store:
- Android: Google Play
- iOS: App Store
Creating a Wallet
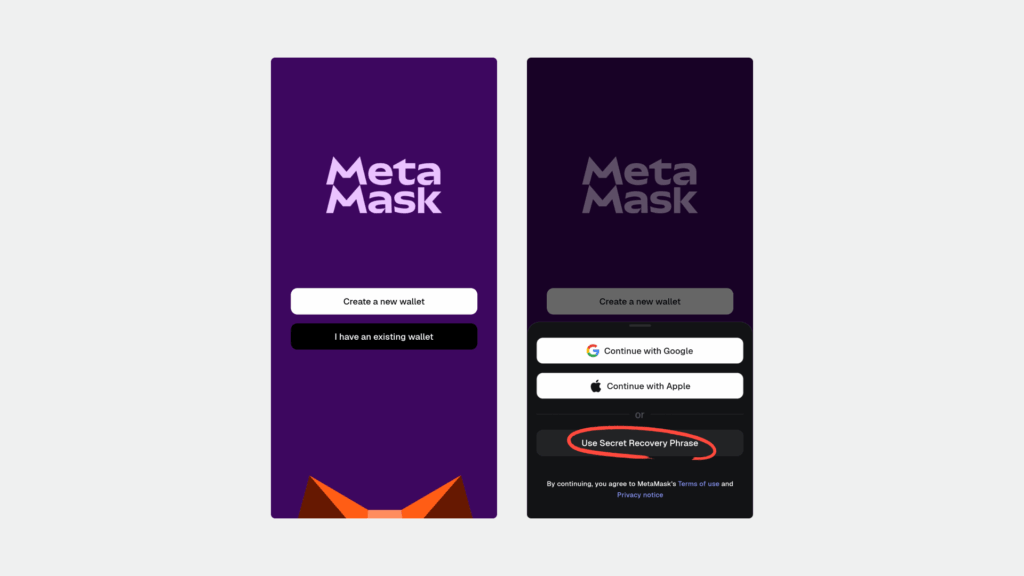
- Open the MetaMask application
- Create a wallet in a way convenient for you, following the instructions in the application
- Create a strong password to protect the application
We recommend using the Recovery Phrase (seed phrase) method for maximum security.
Important: if you use a seed phrase, be sure to write it down on paper and store it in a secure place. Without it, you will not be able to restore access to your wallet if you lose your device.
Configuring Arbitrum One Network
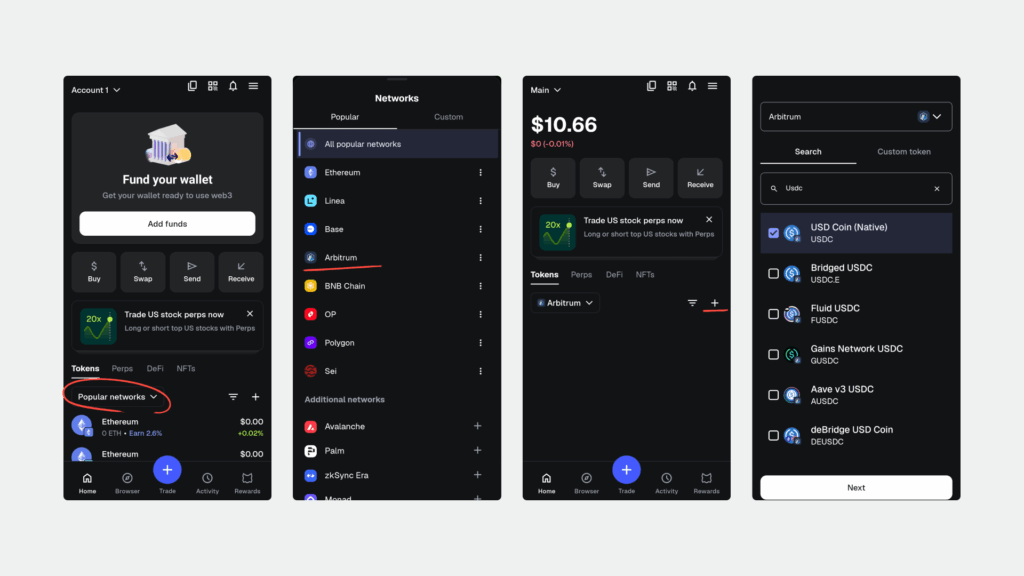
- Open MetaMask
- Tap the network menu at the top of the screen
- Select Arbitrum One
- Enable display of ETH and USDC tokens
Saving Wallet Address
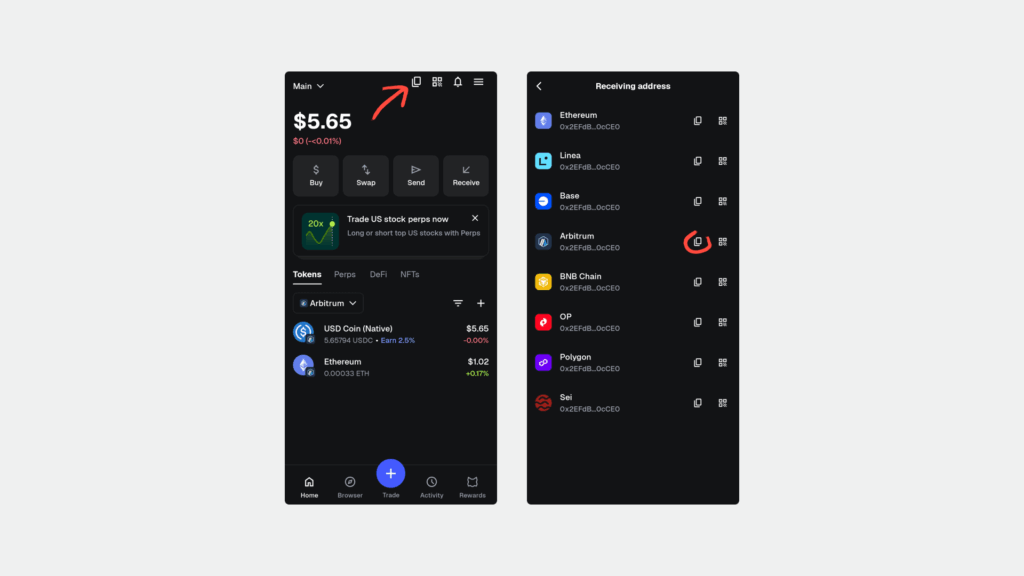
- On the MetaMask main screen, tap the wallet address
- Copy the Arbitrum address
- Save it in a secure place — you will need it for deposits and connection
Funding the Wallet
Transfer to your wallet address:
- ETH: ~$10–20 for commission fees (gas)
- USDC: the amount for trading
Important: when transferring, be sure to select the Arbitrum One network.
After sending, check that the funds have arrived in the MetaMask application.
2. Connecting MetaMask to HyperLiquid
Connecting the Wallet
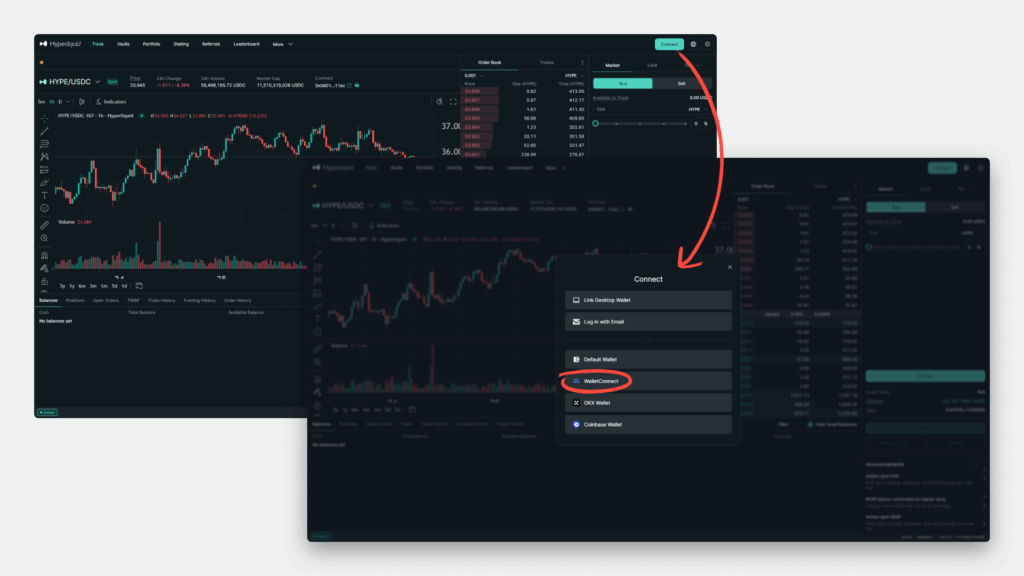
- Open the website app.hyperliquid.xyz/join/MOONTRADER on your computer
- Click the Connect button
- Select the WalletConnect option
Scanning the QR Code
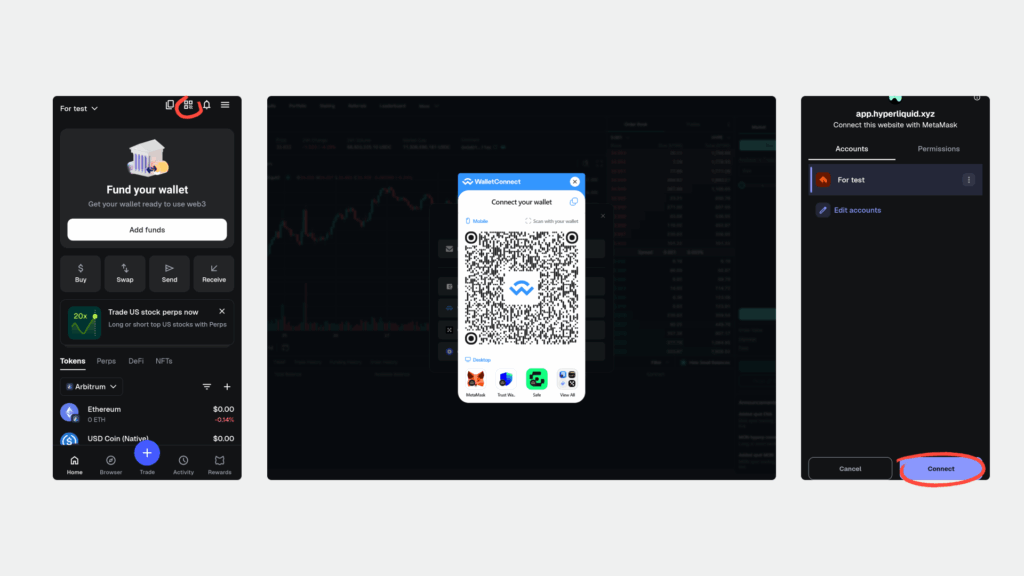
- Open the MetaMask application
- Select the QR code scanner
- Point the camera at the QR code on the computer screen
Confirming the Connection
- In MetaMask, confirm the connection
- Select the account to connect
- Tap Connect
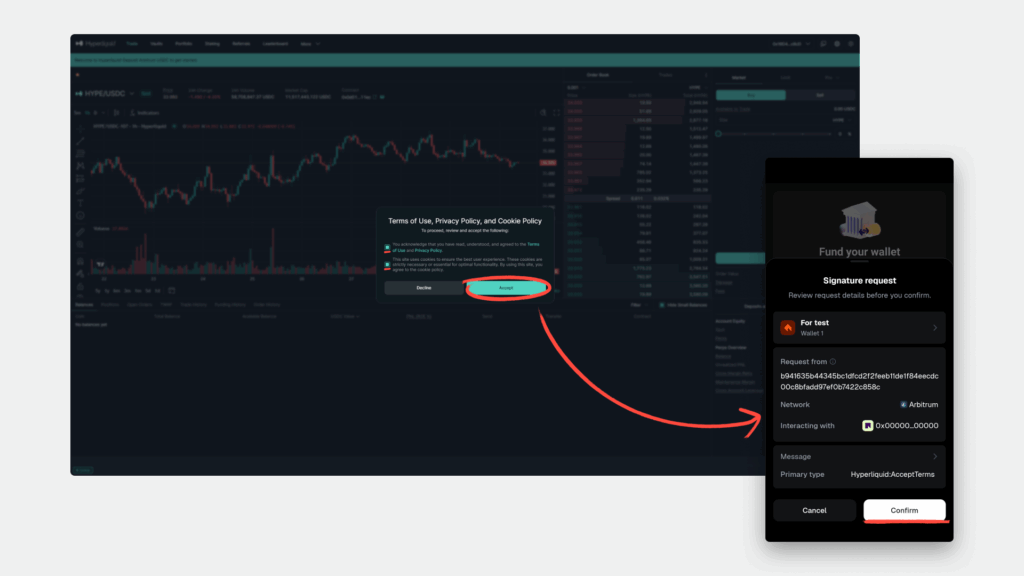
Activating Trading
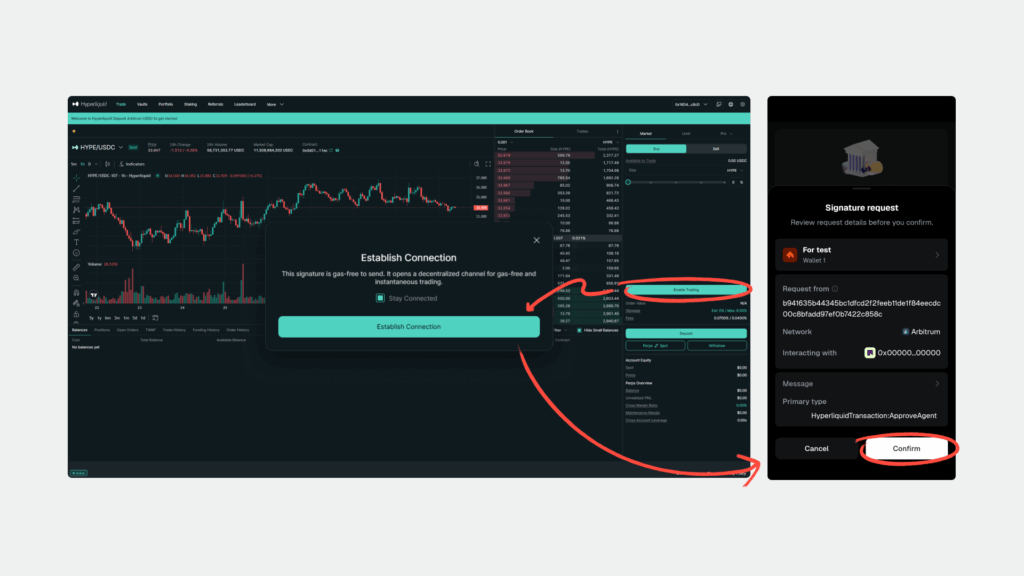
- On the HyperLiquid website, check the boxes agreeing to the terms
- Click Enable Trading
- Confirm the action in the MetaMask application
Depositing to HyperLiquid Balance
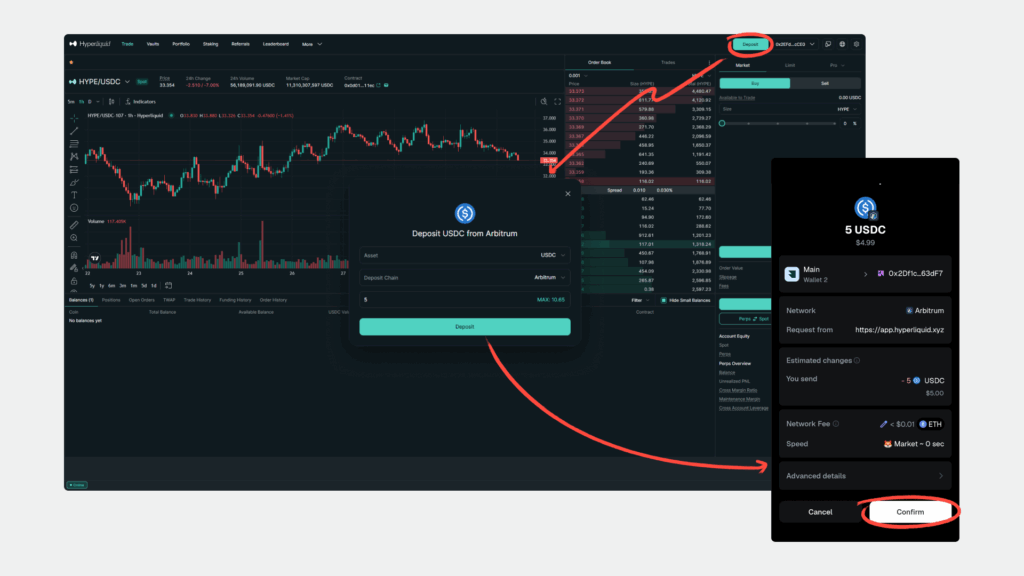
- Click the Deposit button on the HyperLiquid website
- Specify the amount of USDC to transfer
- Confirm the transaction in MetaMask
Important: transfer only USDC. Leave ETH in MetaMask to pay transaction fees.
After confirmation, the funds will appear on your HyperLiquid balance (usually within 1–2 minutes).
3. Creating API Keys on HyperLiquid
Navigating to API Settings
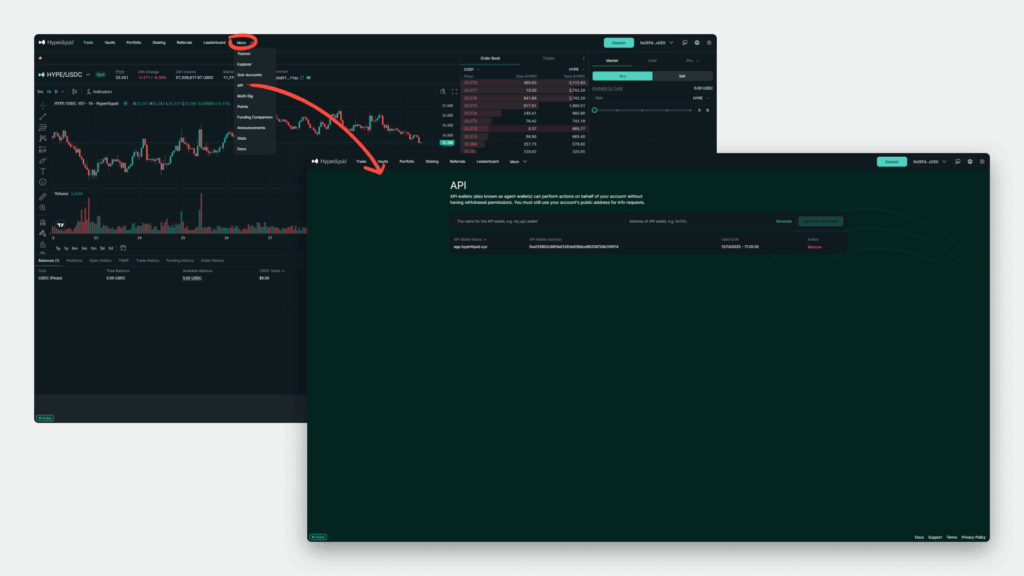
- Log in to Hyperliquid
- Open the More menu
- Select the API section
Generating an API Key
- In the «Name» field, create a name for the key (for example,
MoonTrader) - Click the Generate button
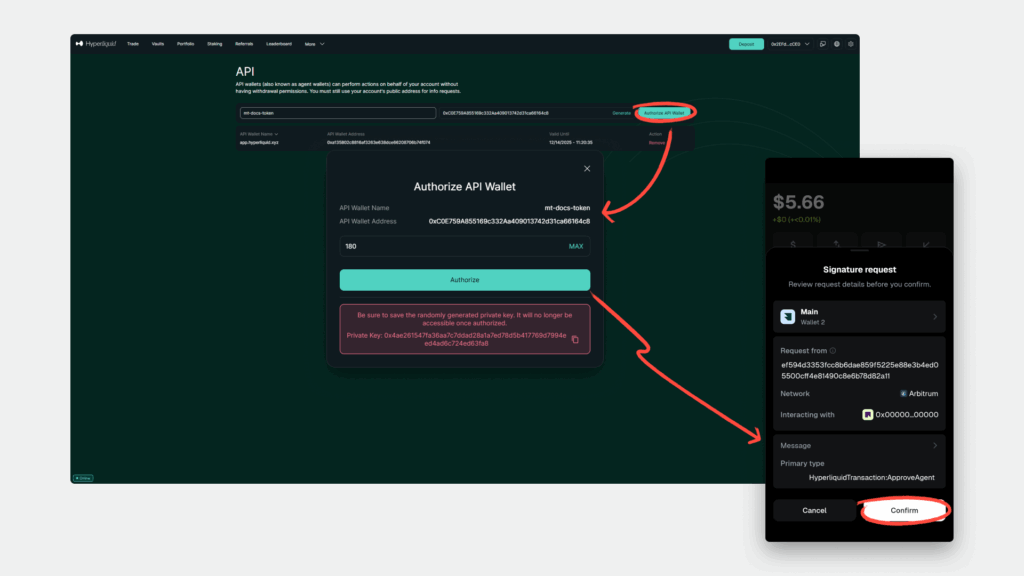
- Click Authorize API Wallet
- Set the maximum key lifetime — 180 days
- Copy and save the Private Key
Important: the private key is shown only once. If you lose it, you will have to create a new API key.
Confirming Creation
- Click the Authorize button
- Confirm the action in the MetaMask application by clicking Confirm
The new API key will appear in the list on the API page.
4. Connecting MoonTrader to HyperLiquid
Creating a License
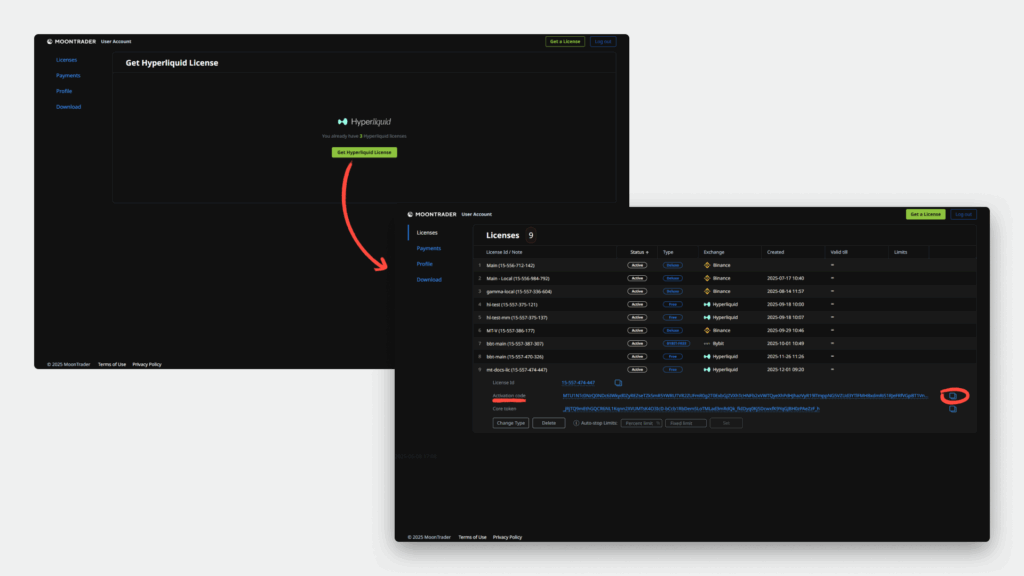
- Go to your personal account on the MoonTrader website
- Create a new license for HyperLiquid: direct link
- Copy the Activation Code from your personal account
Creating a Profile in the Client
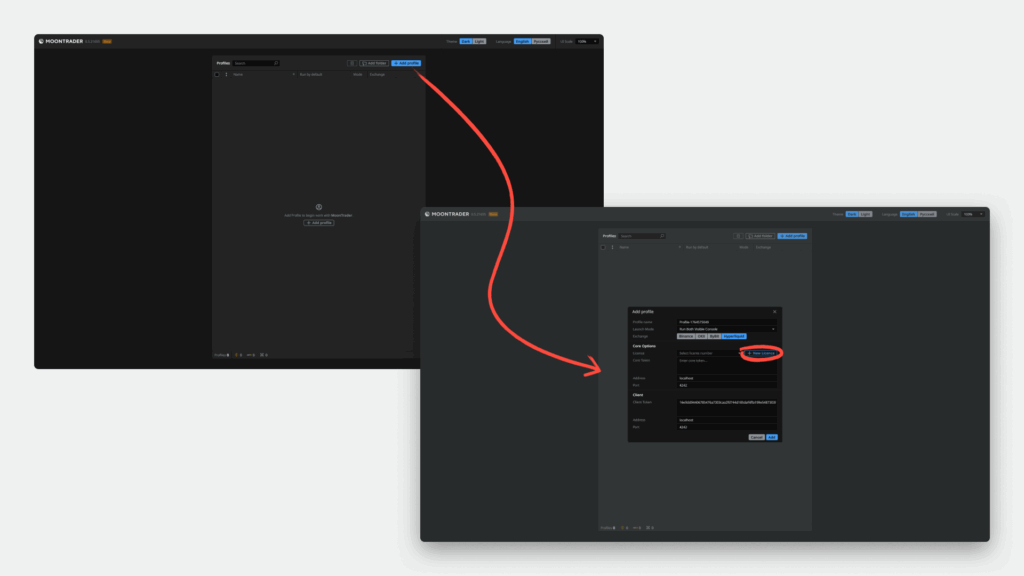
- Launch the MoonTrader terminal
- Click the + Add Profile button
- In the «Launch Mode» field, leave the value Run Both Visible Console
- In the «Exchange» field, select HyperLiquid
- Click + New Licence
Activating the License
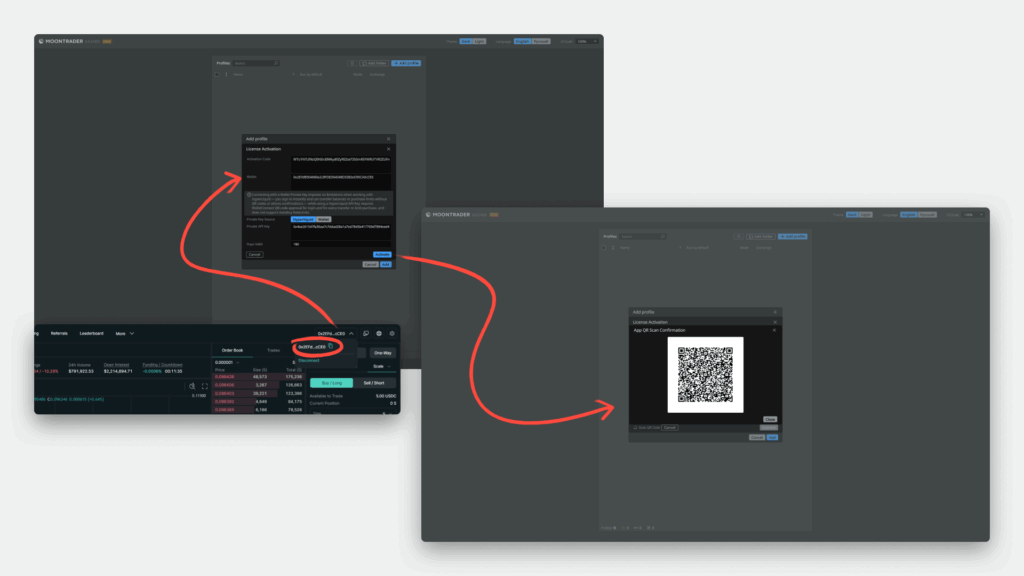
Fill in the data in the activation window:
- Activation Code: paste the code from your MoonTrader personal account
- Wallet: copy the wallet address from HyperLiquid (top right corner of the website)
- Private Key Source: select HyperLiquid
- Private API Key: paste the private key saved when creating the API
- Days Valid: specify 180 (API key validity period)
- Click the Activate button
Connecting via MetaMask
- After clicking Activate, a QR code will appear
- Open the MetaMask application
- Scan the QR code through the scanner in the application
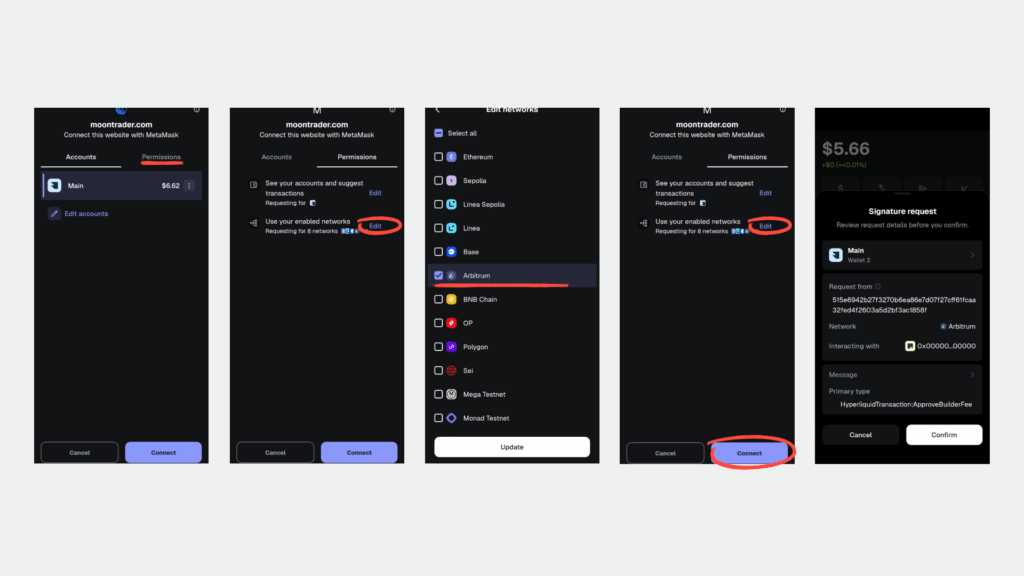
Important: before clicking the Connect button:
- Open the Permissions section
- Click Enabled networks
- Uncheck all boxes
- Leave only the Arbitrum network
- Click Update
- Click Connect
- Confirm the action by clicking Confirm in MetaMask
Completing the Setup
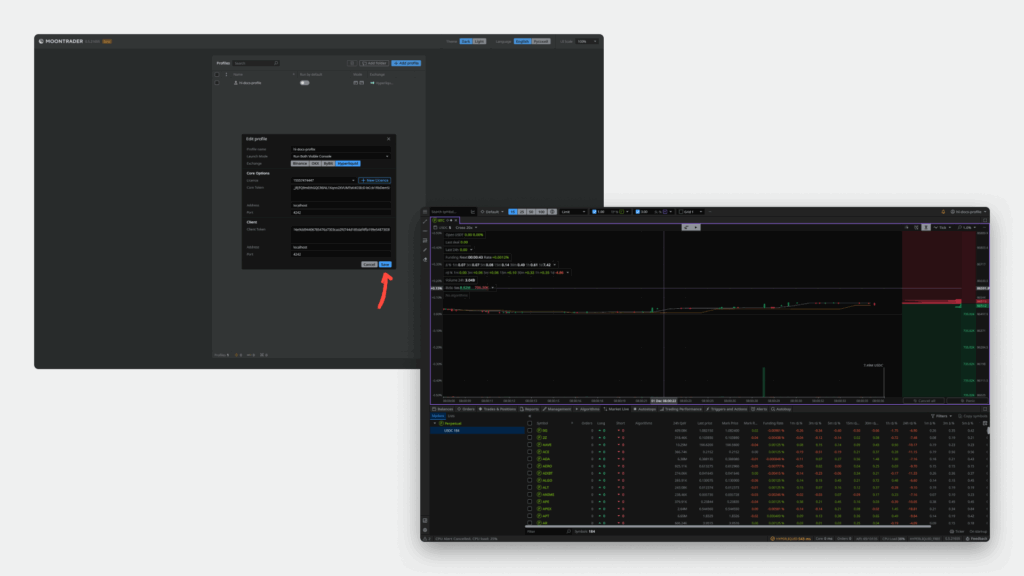
- Core Token: copy from your MoonTrader personal account and paste into the corresponding field
- Click the Add button
The profile is created. To launch the terminal, click the Start button.
5. Checking Connection and Initial Settings
Checking the Connection
- Open the Balances tab in the MoonTrader terminal
- Make sure the USDC balance is displayed correctly
Basic Trading Settings
In the Management section, specify:
- Margin type — choose the appropriate option (Cross or Isolated)
- Leverage size — set the desired leverage
- In the Manual Trading section, select the USDC asset
The terminal is ready for trading.
6. Specifics of Working with HyperLiquid
API Limits
HyperLiquid exchange has limits on the number of API requests. Main rules:
- API limits are tied to the account, not to a specific API key
- Initial limit after creating an address — 10,000 requests
- The limit increases automatically: 1 request = 1 USDC of actual trading volume (only executed orders count)
- When the limit is exhausted, 1 request every 10 seconds is available
- Order cancellations have a separate increased limit — you will be able to cancel orders even with zero main limit
- Additional requests can be purchased at the expense of the HyperLiquid balance
Detailed information: official HyperLiquid documentation
Rate Limit Control in the Terminal:
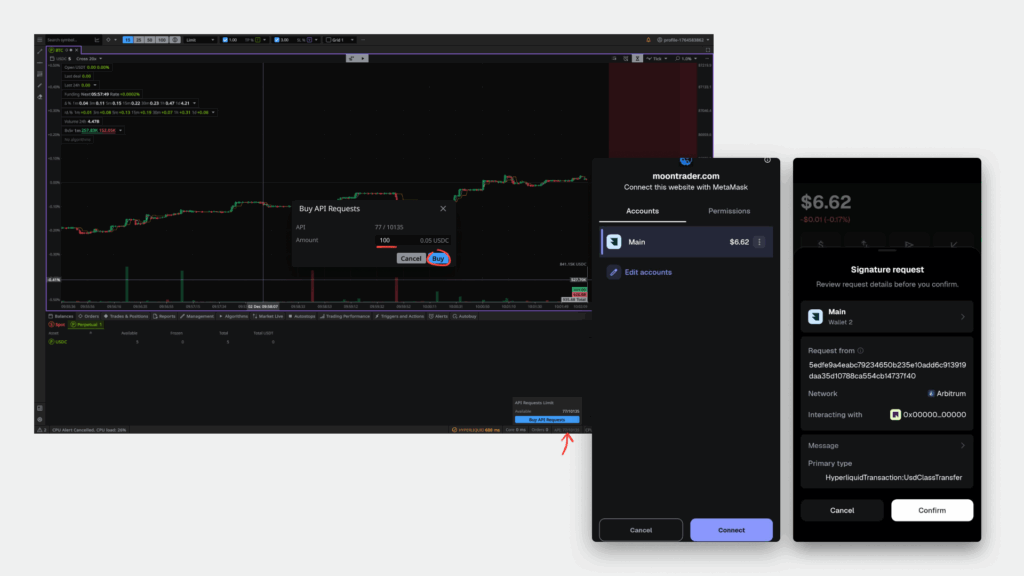
The MoonTrader terminal displays information about spent and available API requests. To purchase additional requests:
- Click on the API information in the terminal interface
- Enter the number of limits you want to buy and click the Buy button
- Scan the appearing QR code through MetaMask
- Confirm the transaction
Balance Management
HyperLiquid separates balances into two separate accounts:
- Spot — for spot asset trading
- Perps — for perpetual contract trading (futures)
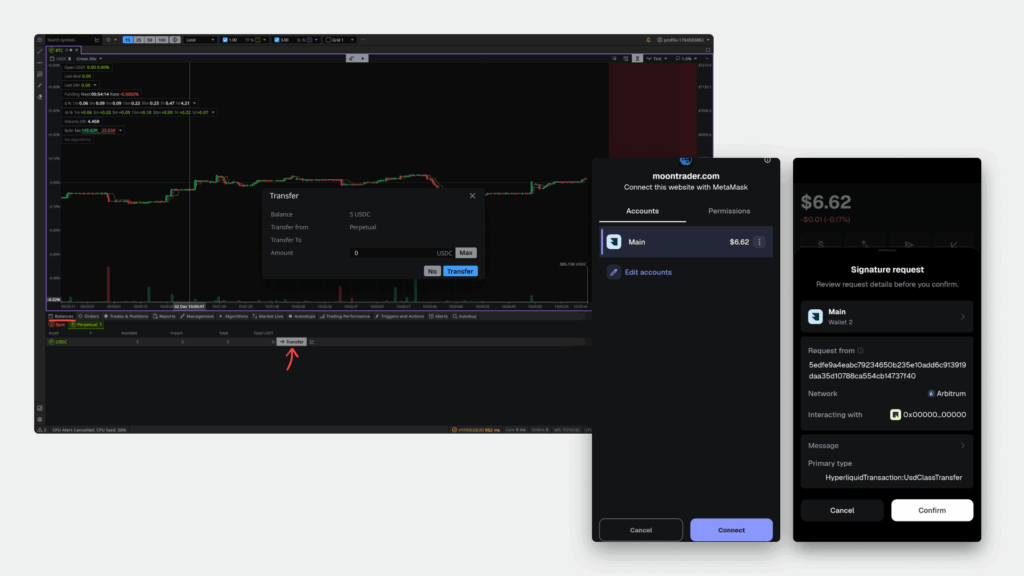
How to transfer funds:
- In the MoonTrader terminal, open the Balances tab
- Select the Perpetual or Spot subtab (depending on where you are transferring funds from)
- Click the Transfer button on the asset you want to transfer
- In the opened window, specify the transfer amount
- Click the Transfer button
- Scan the QR code through MetaMask
- Confirm the transaction in the application
Transfers between accounts are instant and commission-free.
Done! MetaMask is connected to HyperLiquid, and MoonTrader is configured for trading.
Contact and Support
If you have questions about configuration or want to suggest improvements, contact the support team.